

A complete guide to self hosting an ar.io gateway at home
A complete guide to self hosting an ar.io gateway at home
And why you should

Introduction
We are going to set up an ar.io gateway, step by step, on a Raspberry Pi. If you are a beginner to self-hosting, fear not, we’ll walk through each step of the process to get you from zero to a core contributor to the Permaweb. We will be referencing the fantastic YouTube video series created by the ar.io team, as well as their docs, available at ar.io/docs/.
Before learning about Arweave and ar.io, a quick note on self hosting.
What is self-hosting?
Running services like a gateway on a private server that you control is known as self-hosting. Self-hosting allows people to have more control over their data, privacy and computing infrastructure, and has become more and more popular with the growth of cloud computing providers like AWS and Digital Ocean. To add an extra layer of privacy and control, as well as save on monthly server costs, a growing number of people are opting to host services at home using their own hardware.
The Raspberry Pi is a great choice for self hosting. It is a small, affordable, single-board computer (SBC) developed in the UK by the Raspberry Pi Foundation. It was originally designed to promote the teaching of basic computer science skills in schools, particularly in developing countries. Since its launch, it has become popular among hobbyists, creators, and educators because of its low cost, low power requirements, portability, and versatility. It is used in applications from IoT projects and home automation, to commercial displays and PoS kiosks - and even Bitcoin nodes!
Arweave and ar.io
Arweave is a groundbreaking protocol that stores data in a secure and permanent manner, making it ideal for preserving information for the long term. Unlike traditional storage systems that can be vulnerable to data loss, via accidental deletion or intentional corruption / censorship, Arweave uses blockchain technology to ensure that data remains accessible and unchanged over time on a blockchain-like data structure known as the blockweave. Its focus on permanent storage sets it apart from other technologies like filecoin which is more of a low-cost alternative to temporary storage.
The ar.io ecosystem is dedicated to cultivating products and protocols for sustaining access to digital permanence. It is a network of decentralized gateways and permanent domains for the Arweave ecosystem consisting of:
Decentralized, independently operated, gateway nodes
The IO Token
The ArNS Domain Name System
Token incentive structures
A community of digital permanence pioneers
What is an ar.io gateway?
A gateway’s primary role in the Arweave ecosystem is to act as a bridge between the Arweave network and the outside world. It is a front door to the Permaweb - a permanent, decentralized web built on top of the Arweave network. Gateways simplify the technical processes of writing, reading, and discovering data on the blockweave, in a trust-minimized fashion. ar.io gateways are different from standard Arweave gateways in that they are optimized for:
Data retrieval
Caching
Serving
Indexing transactions
Furthermore, gateways make the network more resilient by:
Proxying Layer 1 transaction headers to one or more healthy and active Arweave nodes (miners) to facilitate inclusion in the mempools of as many nodes as possible.
Proxying chunks for Layer 1 Arweave transactions to Arweave nodes to help facilitate storage and replication of the chunks on the blockweave.
Receiving and bundling so-called Layer 2 data items (e.g., ANS-104 spec) as Layer 1 transactions.

Why run your own gateway?
Here are some of the many benefits to running your own gateway at home:
Access to the Arweave network: By running a gateway, you can provide access to the Arweave network to users and developers who want to interact with data stored on the platform. This can help expand the reach and usability of the Arweave ecosystem.
Trustless and private data retrieval: Running a gateway allows users to retrieve data from the Arweave network without relying on a central authority. This enhances data resilience and availability. Gateways can also be configured for enhanced user privacy by disabling logging and data requests tracking.
Support for dapps and developers: Developers often require access to the Arweave network to build and test their apps. Your gateway can serve as a valuable resource for developers, fostering the growth of the Arweave ecosystem.
Be your own network: Serve your own data or build your own apps. Become a developer and contribute to data permanence.
Make permanent data convenient. Gateways facilitate friendly-subdomain-name routing to Arweave transactions via a direct integration with the Arweave Name System (ArNS). They also allow easy consumption of telemetry data for internal and external monitoring and alerting.
Share the load: Gateways provide connectivity to a decentralized network of other ar.io gateways, enabling data sharing and other shared workloads.
Educational opportunities: Operating a gateway can be a valuable learning experience, as you gain insights into Permaweb structure and have full control over data traversal.
Customization and control: When you set up your own gateway, you have control over its configuration, performance, and availability, allowing you to tailor it to your specific needs and requirements.
As you can see, gateways serve a vital role in the ecosystem. By operating a gateway, you contribute to the availability of data on the Arweave network, proxying transactions to nodes, help to support the Arweave network and ensure that important information remains accessible for the long term. It is a fantastic way to actively contribute to the Arweave community. For more information on the benefits of gateways, visit https://ar.io/docs/gateways/#overview.
What kind of resources does a gateway use?
Minimum - for consumer grade hardware for smaller projects:
4 core CPU
4 GB Ram
500 GB storage (SSD recommended)
Stable 50 Mbps internet connection
Recommended - for larger projects
12 core CPU
32GB RAM
2TB SSD storage (for more cached data and larger L2 index)
Stable 1 Gbps internet connection
Raspberry Pi Gateway Requirements
You will need:
PC / Mac and internet connection.
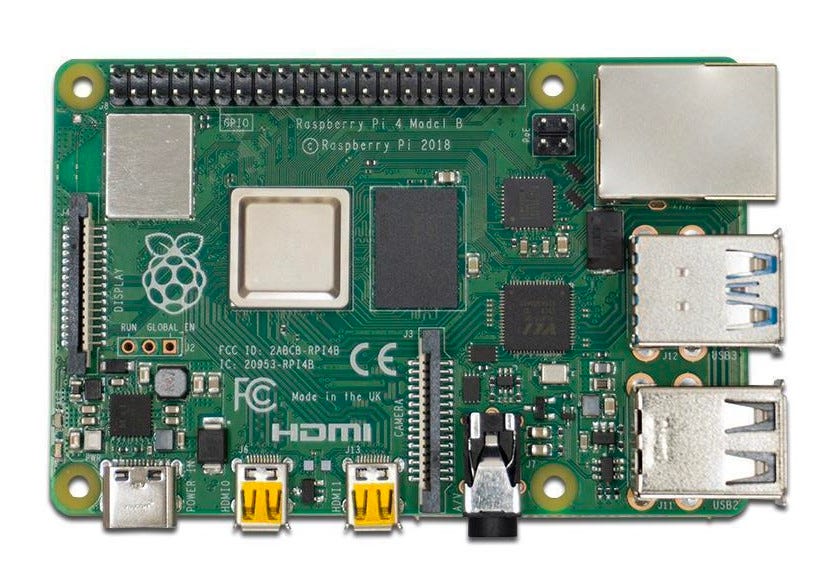
Raspberry Pi: We are using a 4B, 4GB model (approx $55 as of writing). Note: In this tutorial, we may refer to the Raspberry Pi as RPi / Pi interchangeably, for succinctness.

Source: raspberrypi.com
RPi Case: Many options available, usually around $10.
USB-C power supply: Usually $5-10.
Heat management: The RAM and CPU chips on a RPi can get hot. It's best to get a small GPIO pin powered fan, adhesive heat sinks or a case with passive cooling. Fans and heatsinks are inexpensive. You can pick up an aluminum case with passive cooling for around $15. You can also use a combination of all the above for extra cooling, if case dimensions allow.
SSD: An external SSD with USB 3 support is recommended. A 2TB SSD will cost around ~$120.
Why an SSD? SSD stands for Solid State Drive and is a newer generation storage medium to a Hard Disk Drive (HDD). They are non-mechanical (no spinning plates / pins like a HDD) and thus shock / drop resistant - as well as faster.
Raspberry Pi Imager (free software): While there are other ways to flash a microSD card with an operating system, e.g. Balena Etcher, the open source Raspberry Pi Imager software is one of the most popular and most convenient. Find it at raspberrypi.com/software/.
Ethernet cable (optional): We can either plug our Pi into a router directly using a network cable, or configure WiFi when installing the OS.
Most of the necessary equipment above can be bought together in a handy bundle e.g. the CanaKit is quite popular.
Domain (optional): While not required for personal use inside your own local home network, to “expose” your gateway to the outside world it’s best to have a domain name. GoDaddy and Namecheap will have many options.
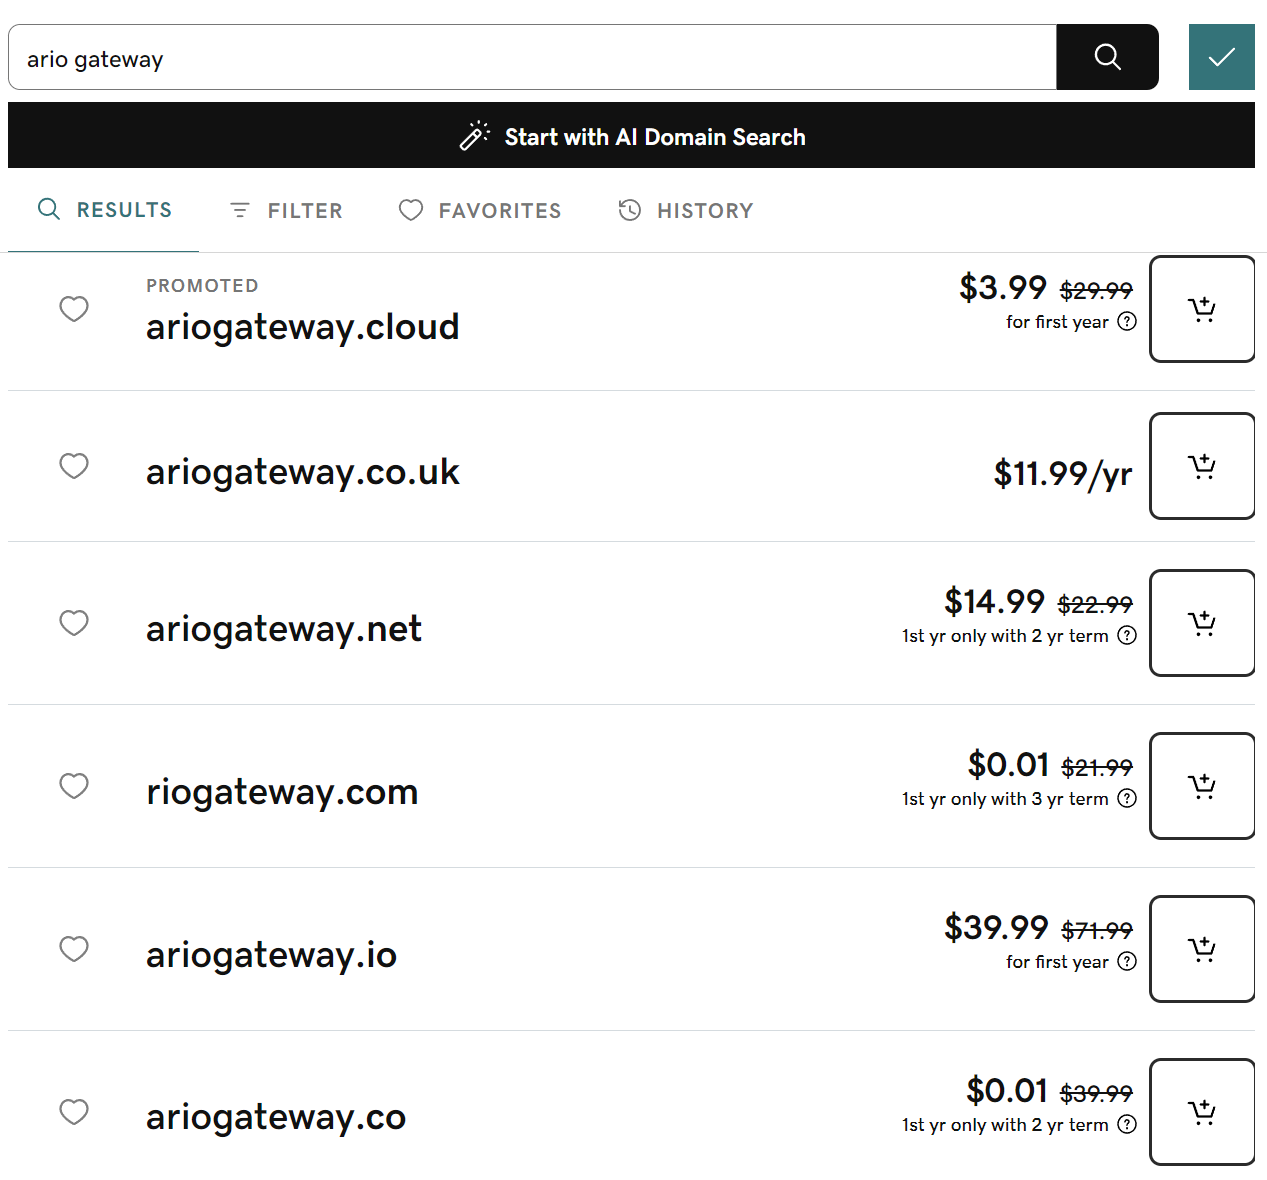
Note: We recommend purchasing the GoDaddy Domain Protection or equivalent add-on for a few extra dollars. Among other things, it ensures domain owners remain anonymous from tools like who.is.
What we're using
Raspberry Pi 4 Model B (4GB RAM)
Cluster case w/ fan

This acts as both a protective casing and provides CPU and RAM cooling via the fan.
Alternatively, an aluminum passive case like the one below (Argon NEO) is a good option if you travel a lot and plan on taking your gateway with you. They are also a good option for IoT projects as they expose the GPIO pins for easy access.

Today we will simply add another unit to an existing Raspberry Pi cluster.
SanDisk Extreme Portable SSD (2TB) w/ travel case and protective cover.


What about a keyboard / mouse?
These are not needed for gateway setup. We will be installing Ubuntu Server (as opposed to Ubuntu Desktop) which does not have a GUI. This saves on disk space and comes with different software preinstalled. This non-GUI Pi setup is also known as a “headless” setup. We can connect to and configure the Pi gateway over SSH from a computer.
Don’t Raspberry Pi’s usually use SD cards?
Yes, however our 2TB SSD will more than suffice for both OS installation and indexing storage. Thus we do not need a microSD and will be installing the OS directly on the SSD, which Raspberry Pi Imager will automatically format for us as a Linux compatible ext4 format.
1. Install the OS (flash your SSD)
We are going to install our gateway on Ubuntu Server, a linux based operating system and one of the most user-friendly and widely-used server platforms available.
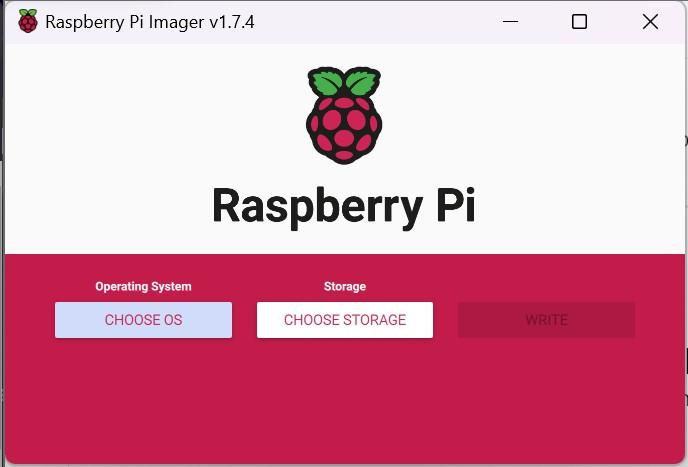
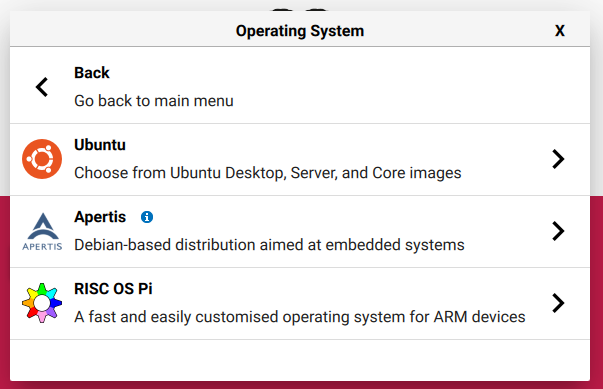
Connect your SSD to your computer and run Raspberry Pi Imager. Click "Choose OS".
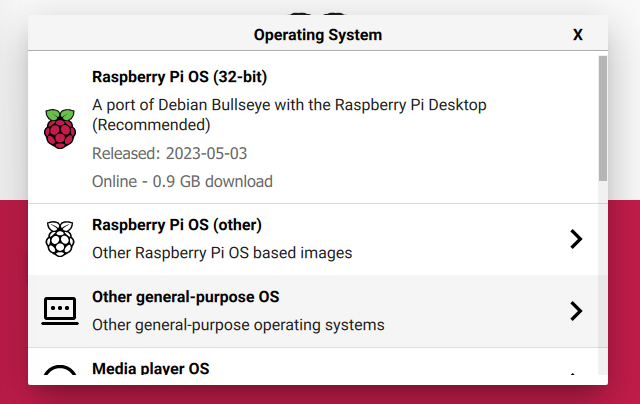
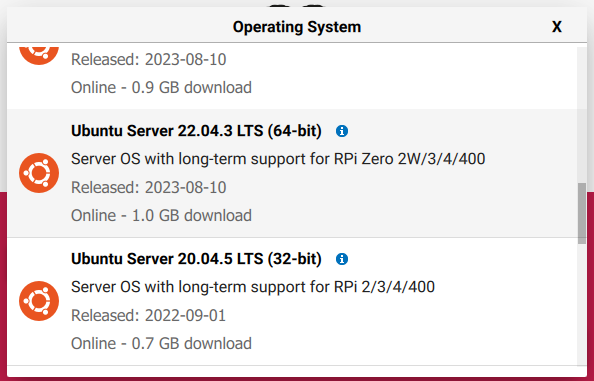
Click "Other general-purpose OS" -> "Ubuntu" and choose Ubuntu Server 22.04 LTS. Our Raspberry Pi 4B is 64-bit, so we will be choosing that image. This is the latest stable (Long Term Support) image as of writing and the version tested with the latest version of ar.io gateway.
Note: You will need to be connected to the internet for this list to populate as the software needs to fetch the latest releases list.
Click "Storage" and select your SDD.
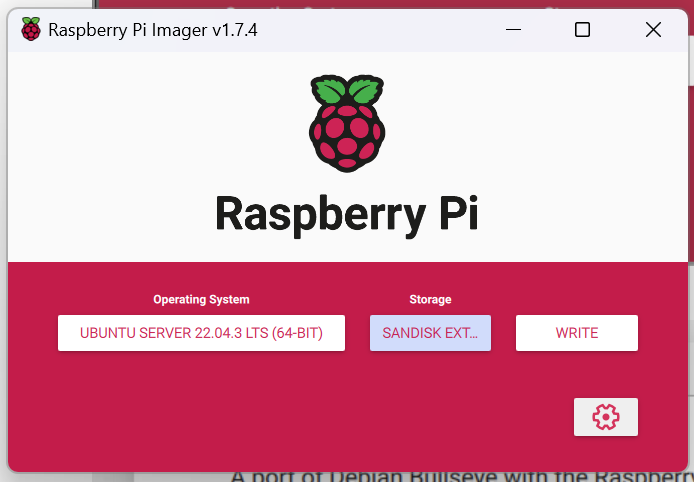

You will note after selecting the OS, a settings icon appeared in the bottom right. This feature helps configure basic settings on the Pi and saves doing them manually later. Click the icon. We will be configuring:
An easily identifiable hostname. This makes it easier to SSH into the device. If this is not set, we will be assigned a random one by our local network 192.168.X.X . In such a case, a tool like Angry IP Scanner can be used to view all devices on your local network.
SSH. Secure Socket Shell sets up an encrypted connection between two computers (e.g. our computer and the Raspberry Pi) allowing us to set up a device, run commands etc. via a remote connection without the need for a mouse, keyboard and monitor plugged into the device.
We will set up a username and password login to begin with but strongly recommend the more secure private key authentication system in production. Follow this tutorial to set up.
As we will be plugging our Pi directly into a router, we do not need to configure WiFi (WLAN). Click "Save".
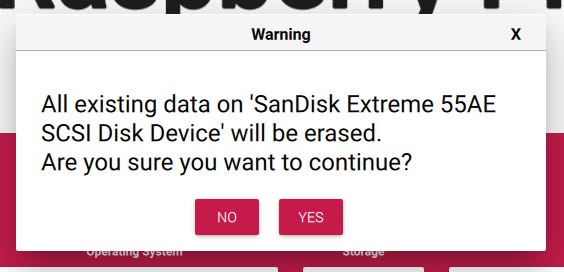
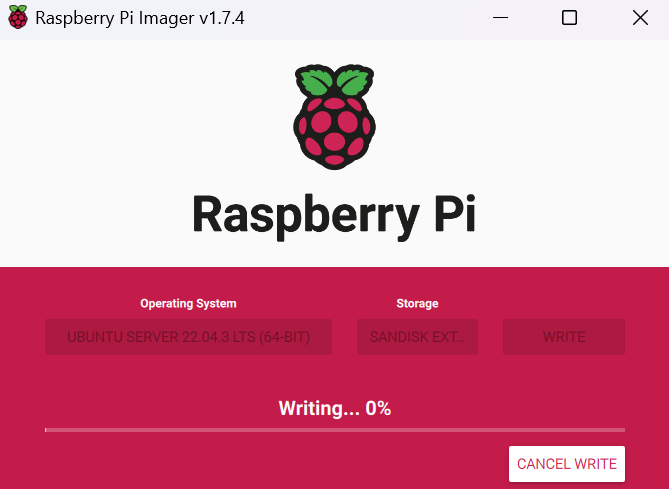
Click "Write" to write the OS to our Pi using the selected settings. This may take a while depending on internet connection as a Ubuntu Server image will need to be downloaded and written to the SSD. Click "Yes" to the prompt reminding you that flashing the SSD will delete all current files on the drive. If you have any important files on the drive, back them up elsewhere before proceeding.


You can now plug the SSD into the Pi and turn it on. We will connect the to one of the blue colored USB ports (the faster USB 3.0 ports). The Pi will automatically detect our Ubuntu OS on the ext4 formatted drive.
2. Test and update the Pi
1. Connect to the Pi
Make sure your computer is connected to the same internet network as the Pi, via wifi or cable. We are using a Mac for this setup, though many of the following commands will also work in Windows Powershell.
Open up a terminal window. Lets first check if the Pi is successfully online (feel free to copy and paste code blocks directly into your terminal, replacing “ariogateway” with the hostname you chose above).
ping ariogateway.local
✅ Success. Our Pi is running and was assigned a local address of 192.168.50.16. Remember, this IP is private to our local (home router) network and cannot be accessed from the internet.
2. Run some basic checks
Let's access our Pi using the SSH settings we configured in Raspberry Pi Imager, choosing "Yes" when asked if we want to add the Gateway address to our `known hosts` file, and entering our password when prompted.
ssh ryze@ariogateway.local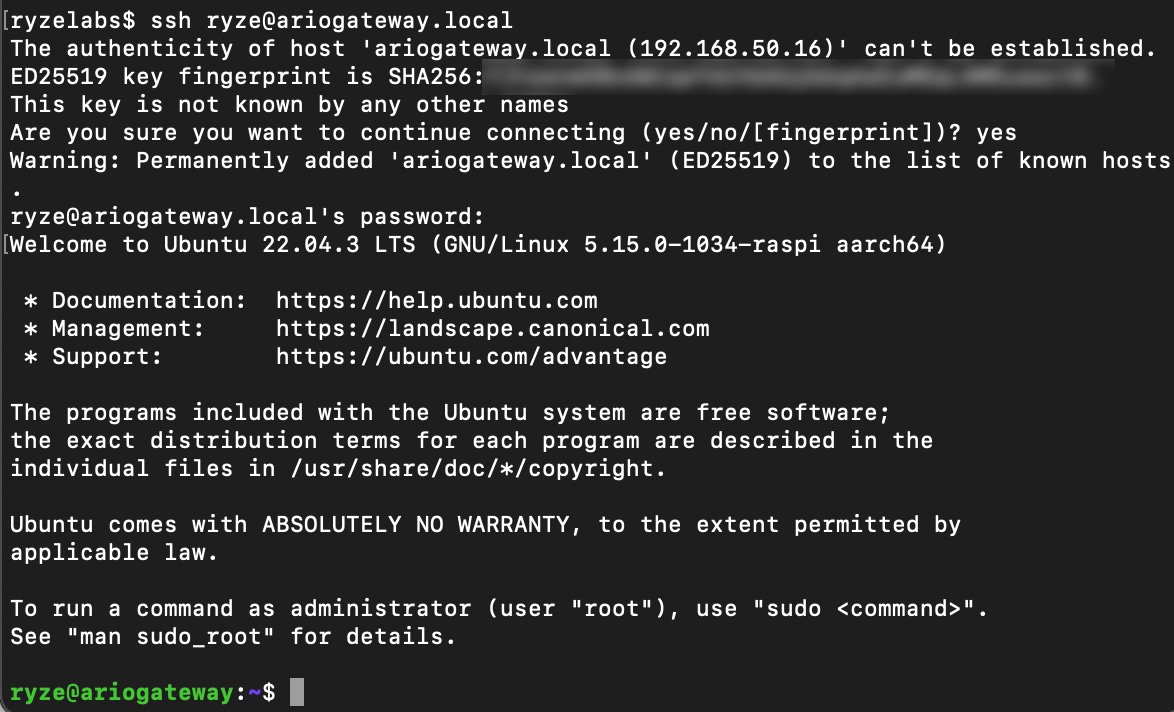
✅ We’re in!
Following along with the tutorial, Let's run some further commands.
df -h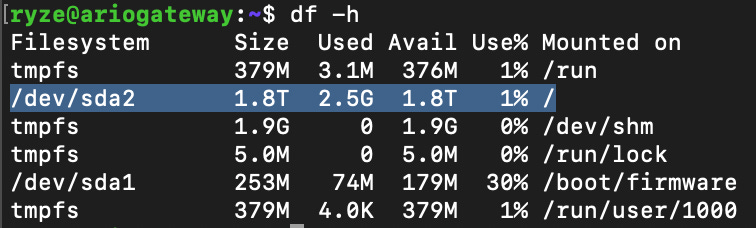
✅ Our 2TB SDD is online and still has 1.8TB left.
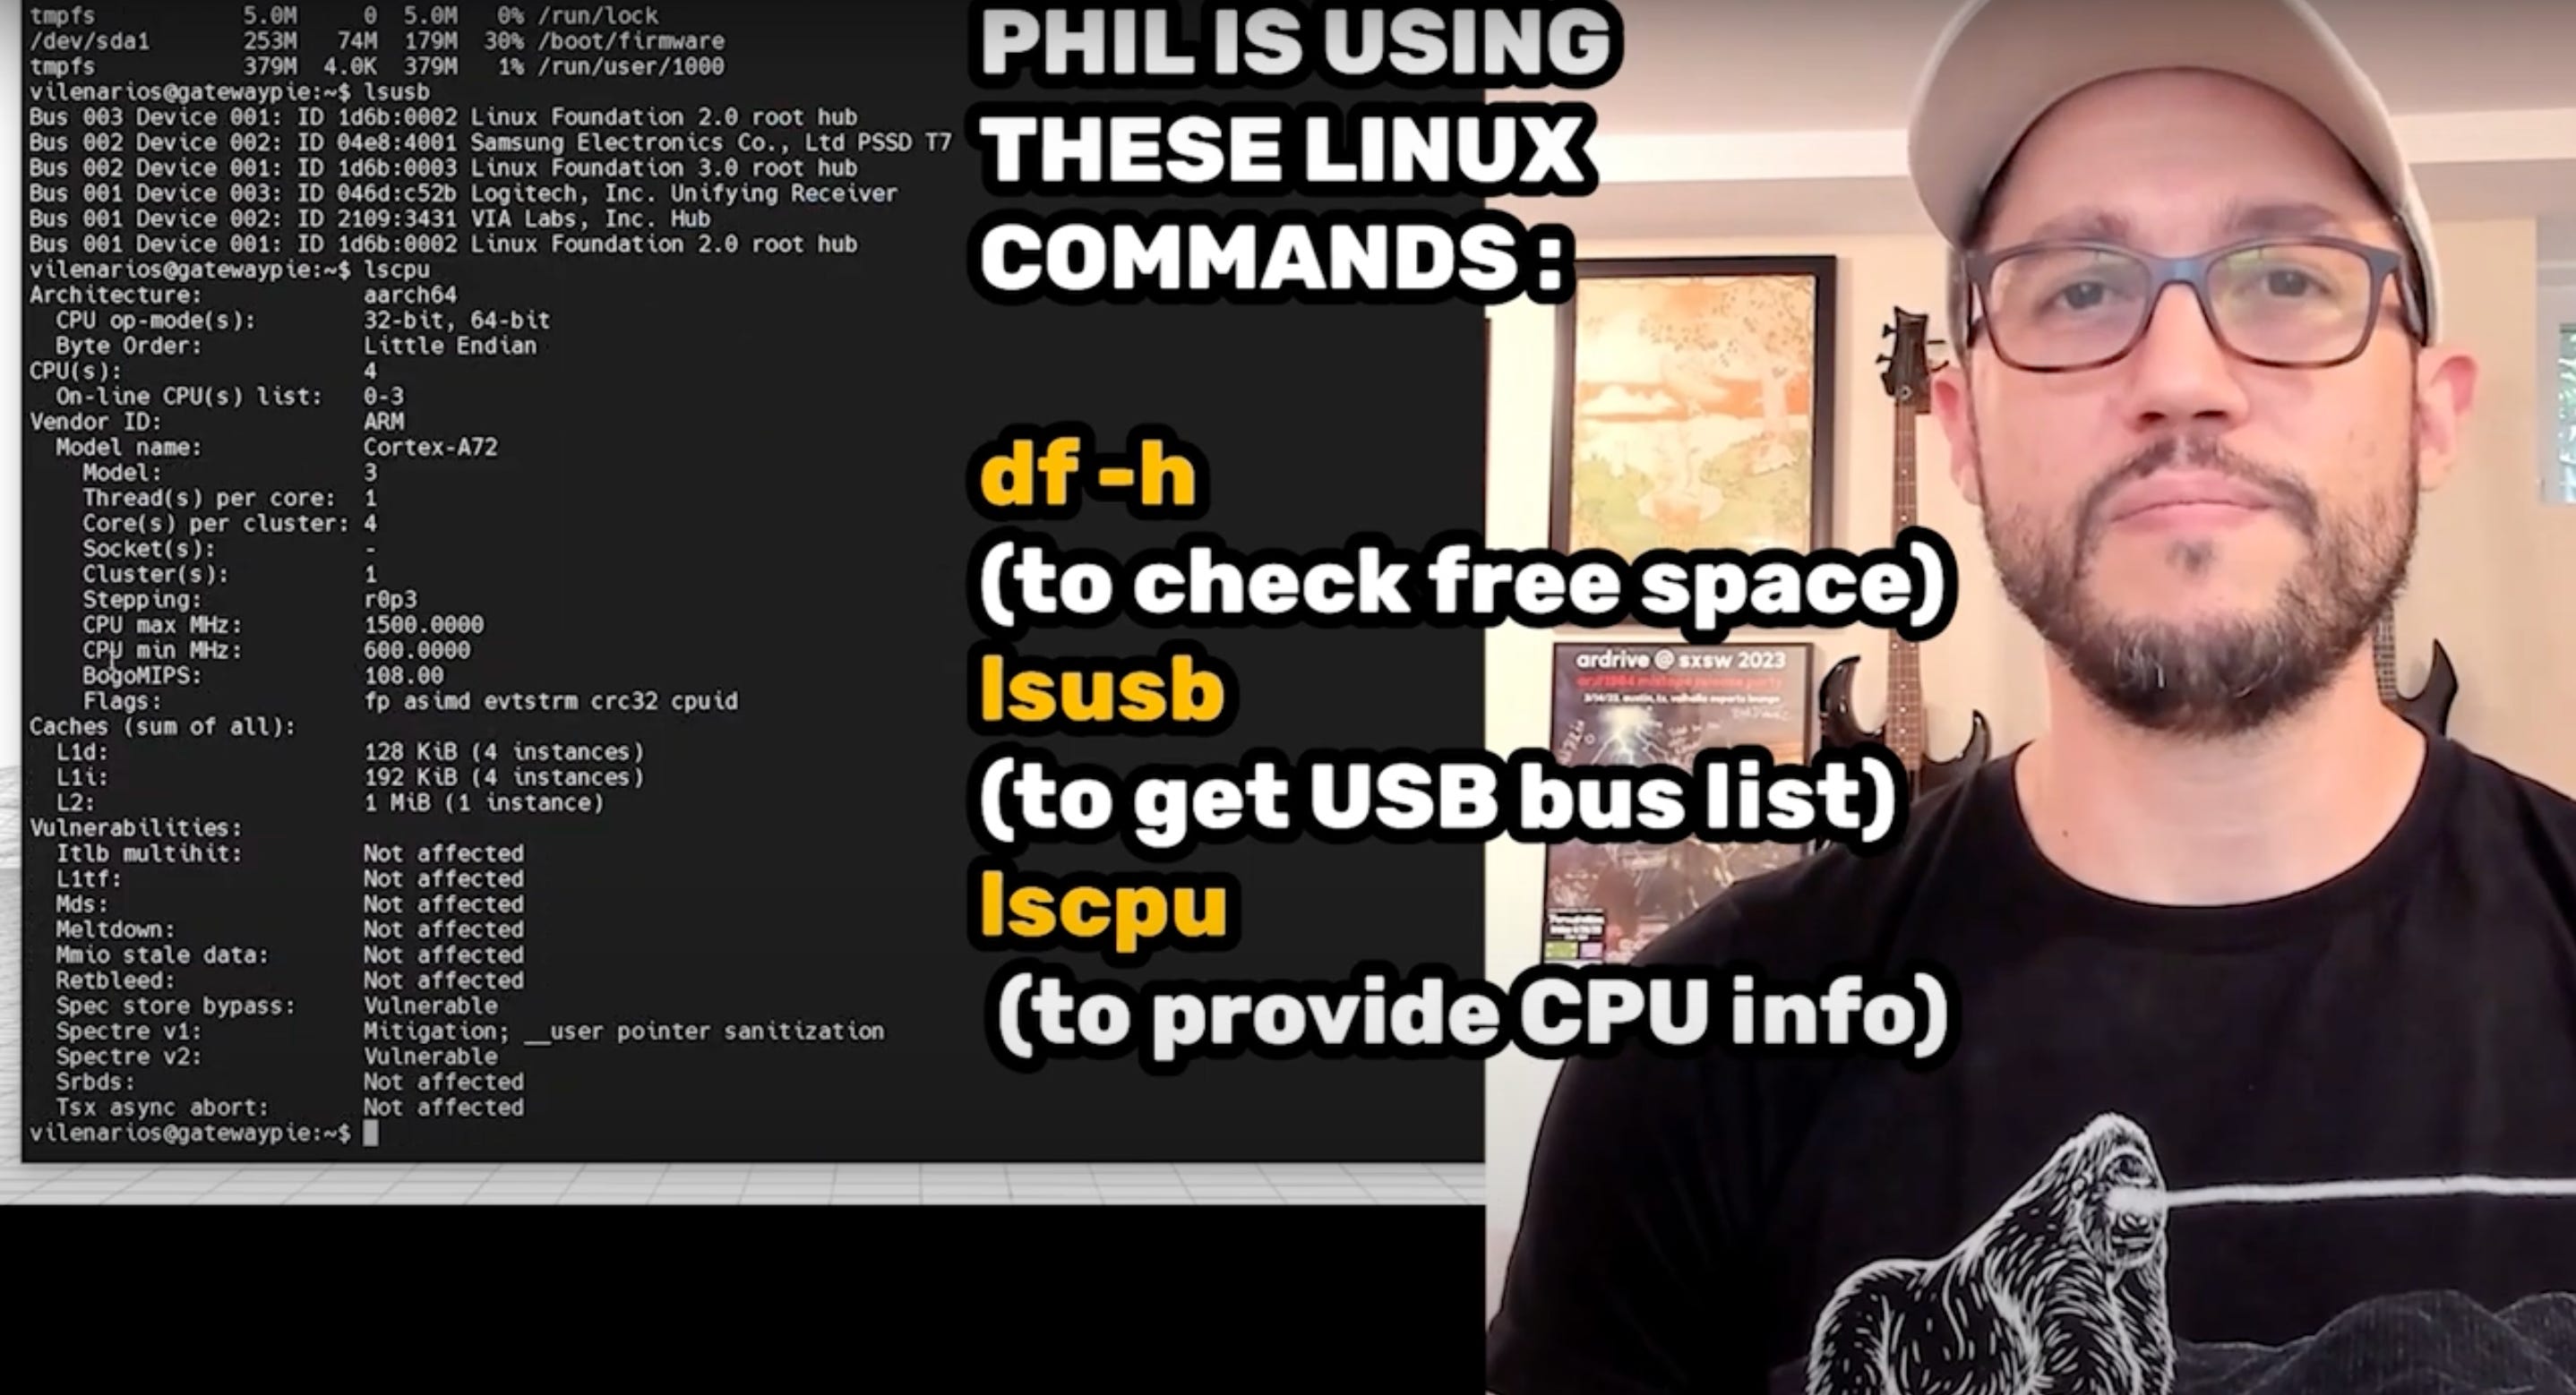
lsusb
✅ Our USB ports are working fine. We can see our SSD is plugged in, with 1 remaining USB 3.0 port and two USB 2.0 ports.
lscpu
✅ We are running a 64bit ARM CPU with 4 cores, meeting the minimum requirements for a gateway.
3. Update the system
Before installing new packages it is best practice to update the our system by updating the package list then upgrading the packages themselves. This can be done in one line by joining commands with && (the AND operator). We use sudo (super user do) to execute the command with admin privileges, as is required, and pass in the -y flag which will automatically confirm Yes to any confirmation requests during the update process. We may be asked to enter our password again due to the sudo command. Allow some time for the process to complete.
Note:
aptis the Advanced Packaging Tool of Linux and is used when installing packages.apt-getis similar but provides more control and is more commonly used with system packages. Package Managers are useful as they not only install packages but manage versions, track and install other dependencies etc.
sudo apt-get update -y && sudo apt-get upgrade -y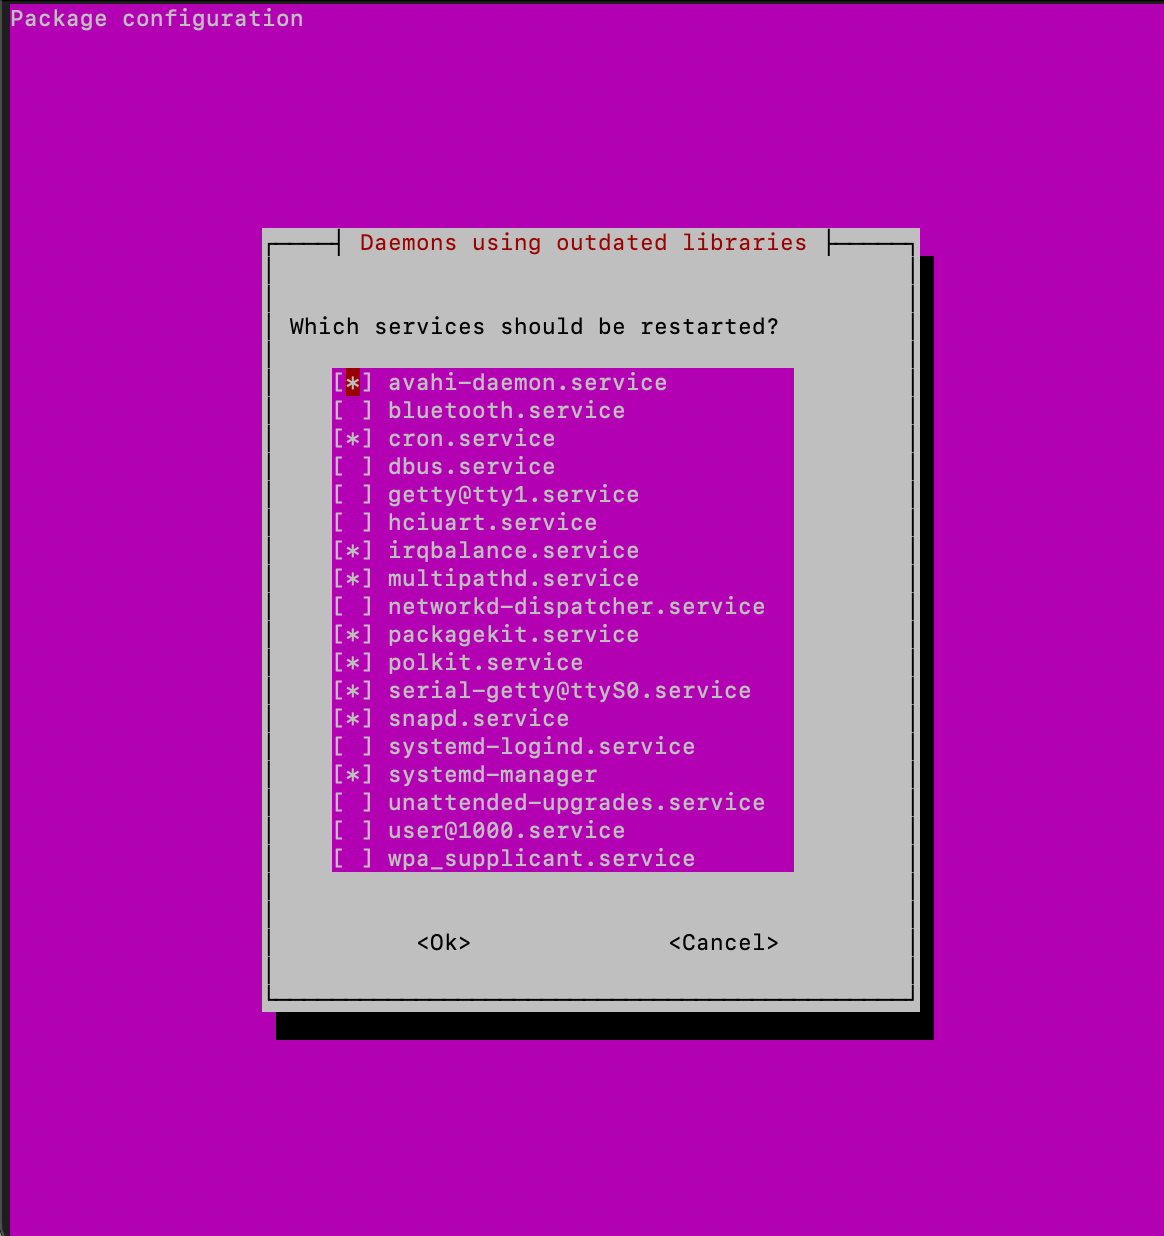
Press the Enter key to accept any default behaviour that isn't caught by the -y flag.
4. Restart the Pi
After that update, its a good idea to restart the device by running the shutdown command, passing the -r restart flag and specifying we want it to happen now. Note this will automatically disconnect us from the device.
sudo shutdown -r now
3. Install packages and dependencies
After a few minutes, let’s SSH back into our Pi.
ping ariogateway.localWe need to install some prerequisite packages for our Gateway to run properly. Let’s go through each one.
1. Docker
Docker is a popular software that allows users to run software in packages called "containers" that are pre-packaged, run out of the box and include most of the necessary packages and infrastructure needed for a particular program. It offers portability, consistency, and scalability for deploying applications in different environments.

In the above example, the Physical server is our Raspberry Pi, and the Host operating system is Ubuntu Server. Docker allows us to plug-and-play a host of free and open source docker images with ease. Install using:
sudo apt install docker-compose -yRun a quick test with:
sudo docker run hello-world
✅ This successfully pulled the hello-world image from hub.docker.com and executed it. You can see the steps it took in the terminal window, confirming everything is working ok.
We will double confirm that Docker is installed correctly by checking it's version using:
sudo docker-compose --version
2. NodeJS
In case we want to run our Gateway outside of Docker and have more control over configuration, we will also install NodeJS - a server environment that allows us to run Javascript and Typescript code on our device (at.io Gateways are written in TypeScript).
Note: ar.io Gateways require NodeJS v16 or higher. The NodeSource Github repository, which provides easy scripts for installing specific node versions, has been updated. Thus, we will be following these steps to install the correct version.
Remove old local (on our Pi) repository (if any)
sudo rm /etc/apt/sources.list.d/nodesource.listDefine the version we require
NODE_MAJOR=16Update packages
sudo apt-get updateInstall necessary packages for downloading and verifying new repository information

Note: Some of the above packages, particularly curl, are so common that they are probably already installed by default.
sudo apt-get install -y ca-certificates curl gnupgMake a new directory (if it doesn't already exist) for the repository's keyring (like Apple Keyrings - a secret password / credential).
sudo mkdir -p /etc/apt/keyringsDownload the new repository's GPG (GNU Privacy Guard) key and save it in the keyring directory.
curl -fsSL https://deb.nodesource.com/gpgkey/nodesource-repo.gpg.key | sudo gpg --dearmor -o /etc/apt/keyrings/nodesource.gpgAdd the new repository's source list with its GPG key for package verification. Note how we are using the
NODE_MAJORvariable we set above.
echo "deb [signed-by=/etc/apt/keyrings/nodesource.gpg] https://deb.nodesource.com/node_${NODE_MAJOR}.x nodistro main" | sudo tee /etc/apt/sources.list.d/nodesource.listUpdate packages and install NodeJS
sudo apt-get updatesudo apt-get install -y nodejsAfter install we can confirm it was successful by checking the node version:
node -v
3. Yarn, GCC, G++

The Yarn package manager is not included in the standard Linux repository of packages, so we must securely add it before installing. We add Yarn to our core apt package manager by adding the official public key to our apt-key manager. This ensures we never install any unofficial or malicious packages not approved by Yarn.
You may get a deprecated warning for apt-key, this can be ignored.
curl -sS https://dl.yarnpkg.com/debian/pubkey.gpg | sudo apt-key add -We then add the official package list to our apt sources list
echo "deb https://dl.yarnpkg.com/debian/ stable main" | sudo tee /etc/apt/sources.list.d/yarn.listFinally, we then update our local apt packages list so we can begin installing Yarn approved packages.
sudo apt-get updateNow, we can install all packages at once (GCC, G++ and Make are already in the official repository), accepting all installation prompts with -y:
sudo apt-get install gcc g++ make yarn -y4. git, nginx, certbot, sqlite

All of these are common packages and in the standard repository. Install directly using:
sudo apt install git certbot nginx sqlite3 -y4. ar.io Gateway Setup
1. Download codebase
The time has come! We've laid the ground work and fully prepared our Pi device for gateway set up. Time to add the codebase.
Using git which we installed earlier, we will clone the codebase from the main branch of the official ar.io Github repository to a new folder at the root (/) of our system called ar-io-node.
sudo git clone -b main https://github.com/ar-io/ar-io-node.git /ar-io-nodeDepending on your internet connection, the files should be cloned within a few seconds.
Lets change directory (cd) and have a look around by listing (ls) the files.
cd /ar-io-nodels
✅ Looking good, the files have downloaded ok.
2. Set environment variables.
We will create a new file to save some settings we will be using later. Lets create a new file named .env with nano text editor.
sudo nano .envNote: Filenames beginning with
.are usually system or configuration files and thus hidden by default in the OS file manager. To view all files in a folder, including hidden files, usels -a.
We will set values for our public Arweave wallet identifier (you can set one up using Arconnect), as well as the directories where we will store different data types. Finally we specify that we'll be using standard unencrypted http in our sandbox environment.
AR_IO_WALLET=<enter a wallet address here>
CHUNKS_DATA_PATH=/data/chunks
CONTIGUOUS_DATA_PATH=/data/contiguous
HEADERS_DATA_PATH=/data/headers
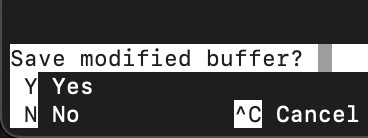
SANDBOX_PROTOCOL=httpTo save our file, we exit -> save changes -> overwrite filename.
Press Ctrl + x to exit

We need to create the data folder that we specified in our environment variables above. While inside the /ar-io-node folder, we run the following command:
sudo mkdir /dataThe Gateway code will create the subfolders (/chunks etc) automatically.
3. Run the codebase
We’ve downloaded the codebase and prepped our variables, now let’s install and run it.
Make sure we’re in the root of our codebase folder, then run the install command.
cd /ar-io-nodesudo yarn install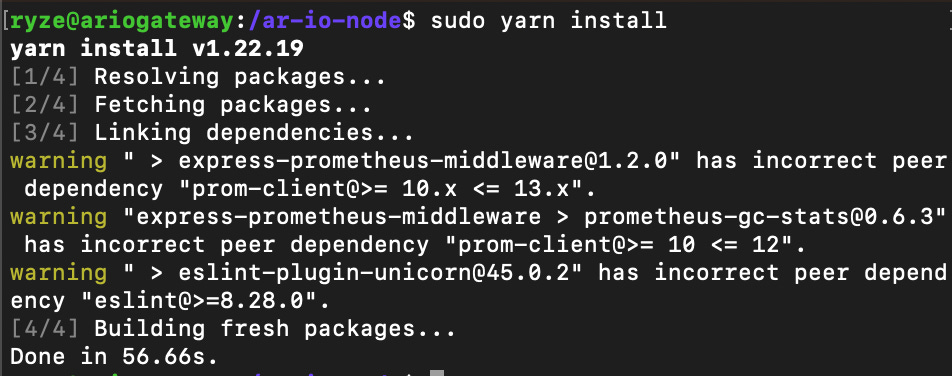
Next step is to migrate the required database tables and run a test.
sudo yarn db:migrate up
sudo yarn test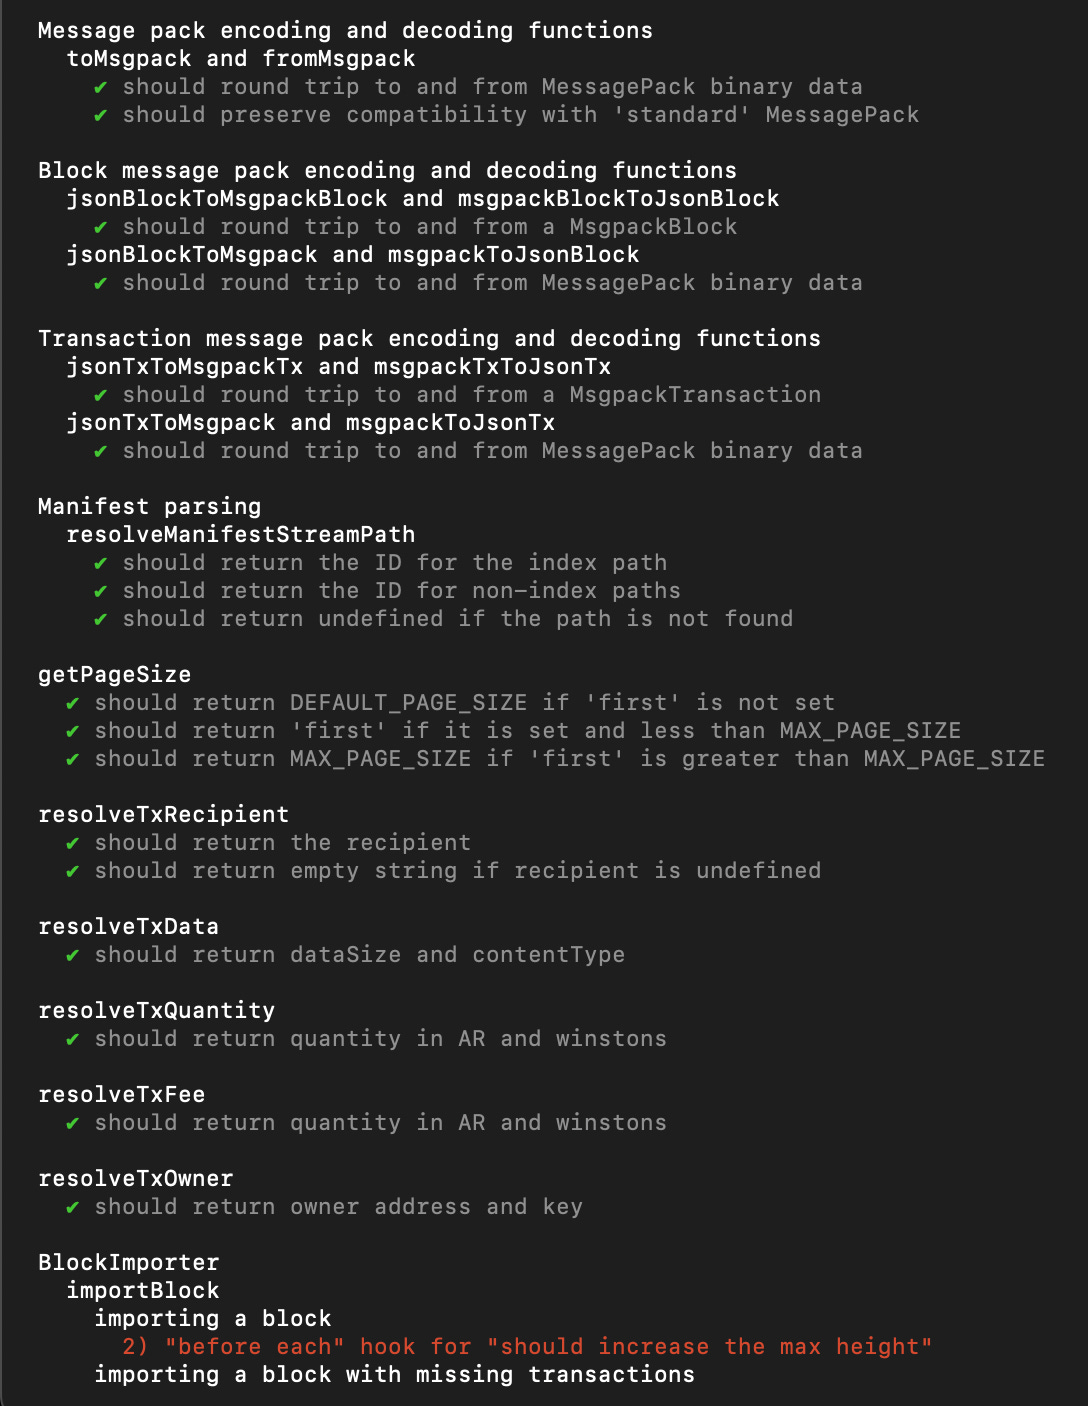
Note: It’s ok to see some errors as they are mostly performance related. This is a personal gateway that we can optimize in the future.
Let's start our gateway.
sudo yarn start
Everything looks good, but as soon as we exit our terminal, the start command will stop. This is where Docker also comes in useful. Let’s start the application in Docker, using up and run it in detached mode using the -d flag so it can run in the background and allow us to exit the terminal at any time.
sudo docker-compose up -d --build
The first container takes a while to build, so be patient.
Now that its up and running, lets check the logs.
The -f flag is for follow, which prints new logs live as they are generated, while --tail=0 states that we want no historical logs, only new logs that come in after we run the command.
sudo docker-compose logs -f --tail=0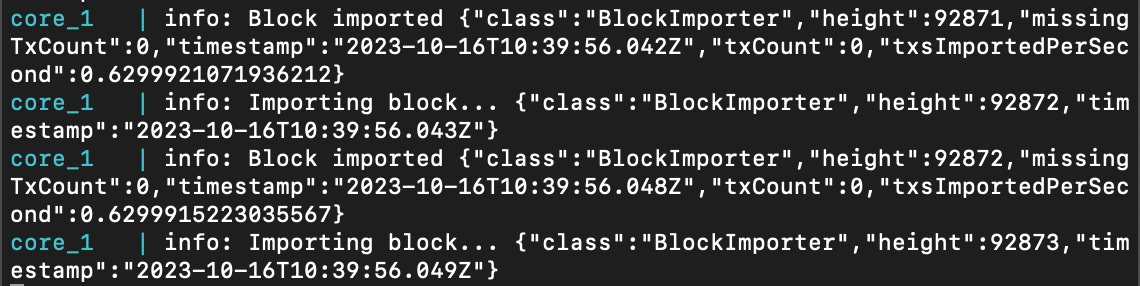
✅ The Gateway is importing blocks successfully as expected.
We can access the local IP / hostname from our browser on port 3000 to check out our running gateway. Visit http://ariogateway.local:3000/ and see basic info like block height and number of peers.

There is no need to worry if your browser has a “Not Secure” icon in the address bar. This is expected as we have not set up SSL yet, and should not be feared as we are still sandboxed inside our own local network.
We can view more detailed metrics at http://ariogateway.local:3000/metrics, though this is quite technical and can always be analyzed later.
A useful feature of running a node yourself is the ability to query data easily. Conveniently, the gateway codebase comes with GraphQL pre-bundled.
GraphQL is a query language for APIs and a runtime for executing those queries with existing data. Unlike traditional REST APIs that require loading from multiple URLs, GraphQL APIs get all the data your app needs in a single request.
We can visit our GraphQL Playground at http://ariogateway.local:3000/graphql. We will run the following command to retrieve the first transaction on the Arweave blockchain.
query {
  transactions(
    first: 1
    sort: HEIGHT_ASC
  ) {
    edges {
      node {
        id
        block {
          height
          timestamp
        }
        owner {
          address
        }
        tags {
          name
          value
        }
        data {
          size
          type
        }
      }
    }
  }
}
The data returned as expected. We have just made our first query on the Arweave blockchain using our own secure Gateway!
We can query data directly from our browser at any time by visiting <hostname>.local:3000/<transaction_id>. Head over to https://viewblock.io/arweave/txs and find a transaction with an image. We can copy the transaction ID and view the data in our browser, privately and trustlessly. Let’s check out http://ariogateway.local:3000/xVaYiidJ6tvZj1ekxmkEbaFY4Q5hbmmPDM5JfTttUs4.
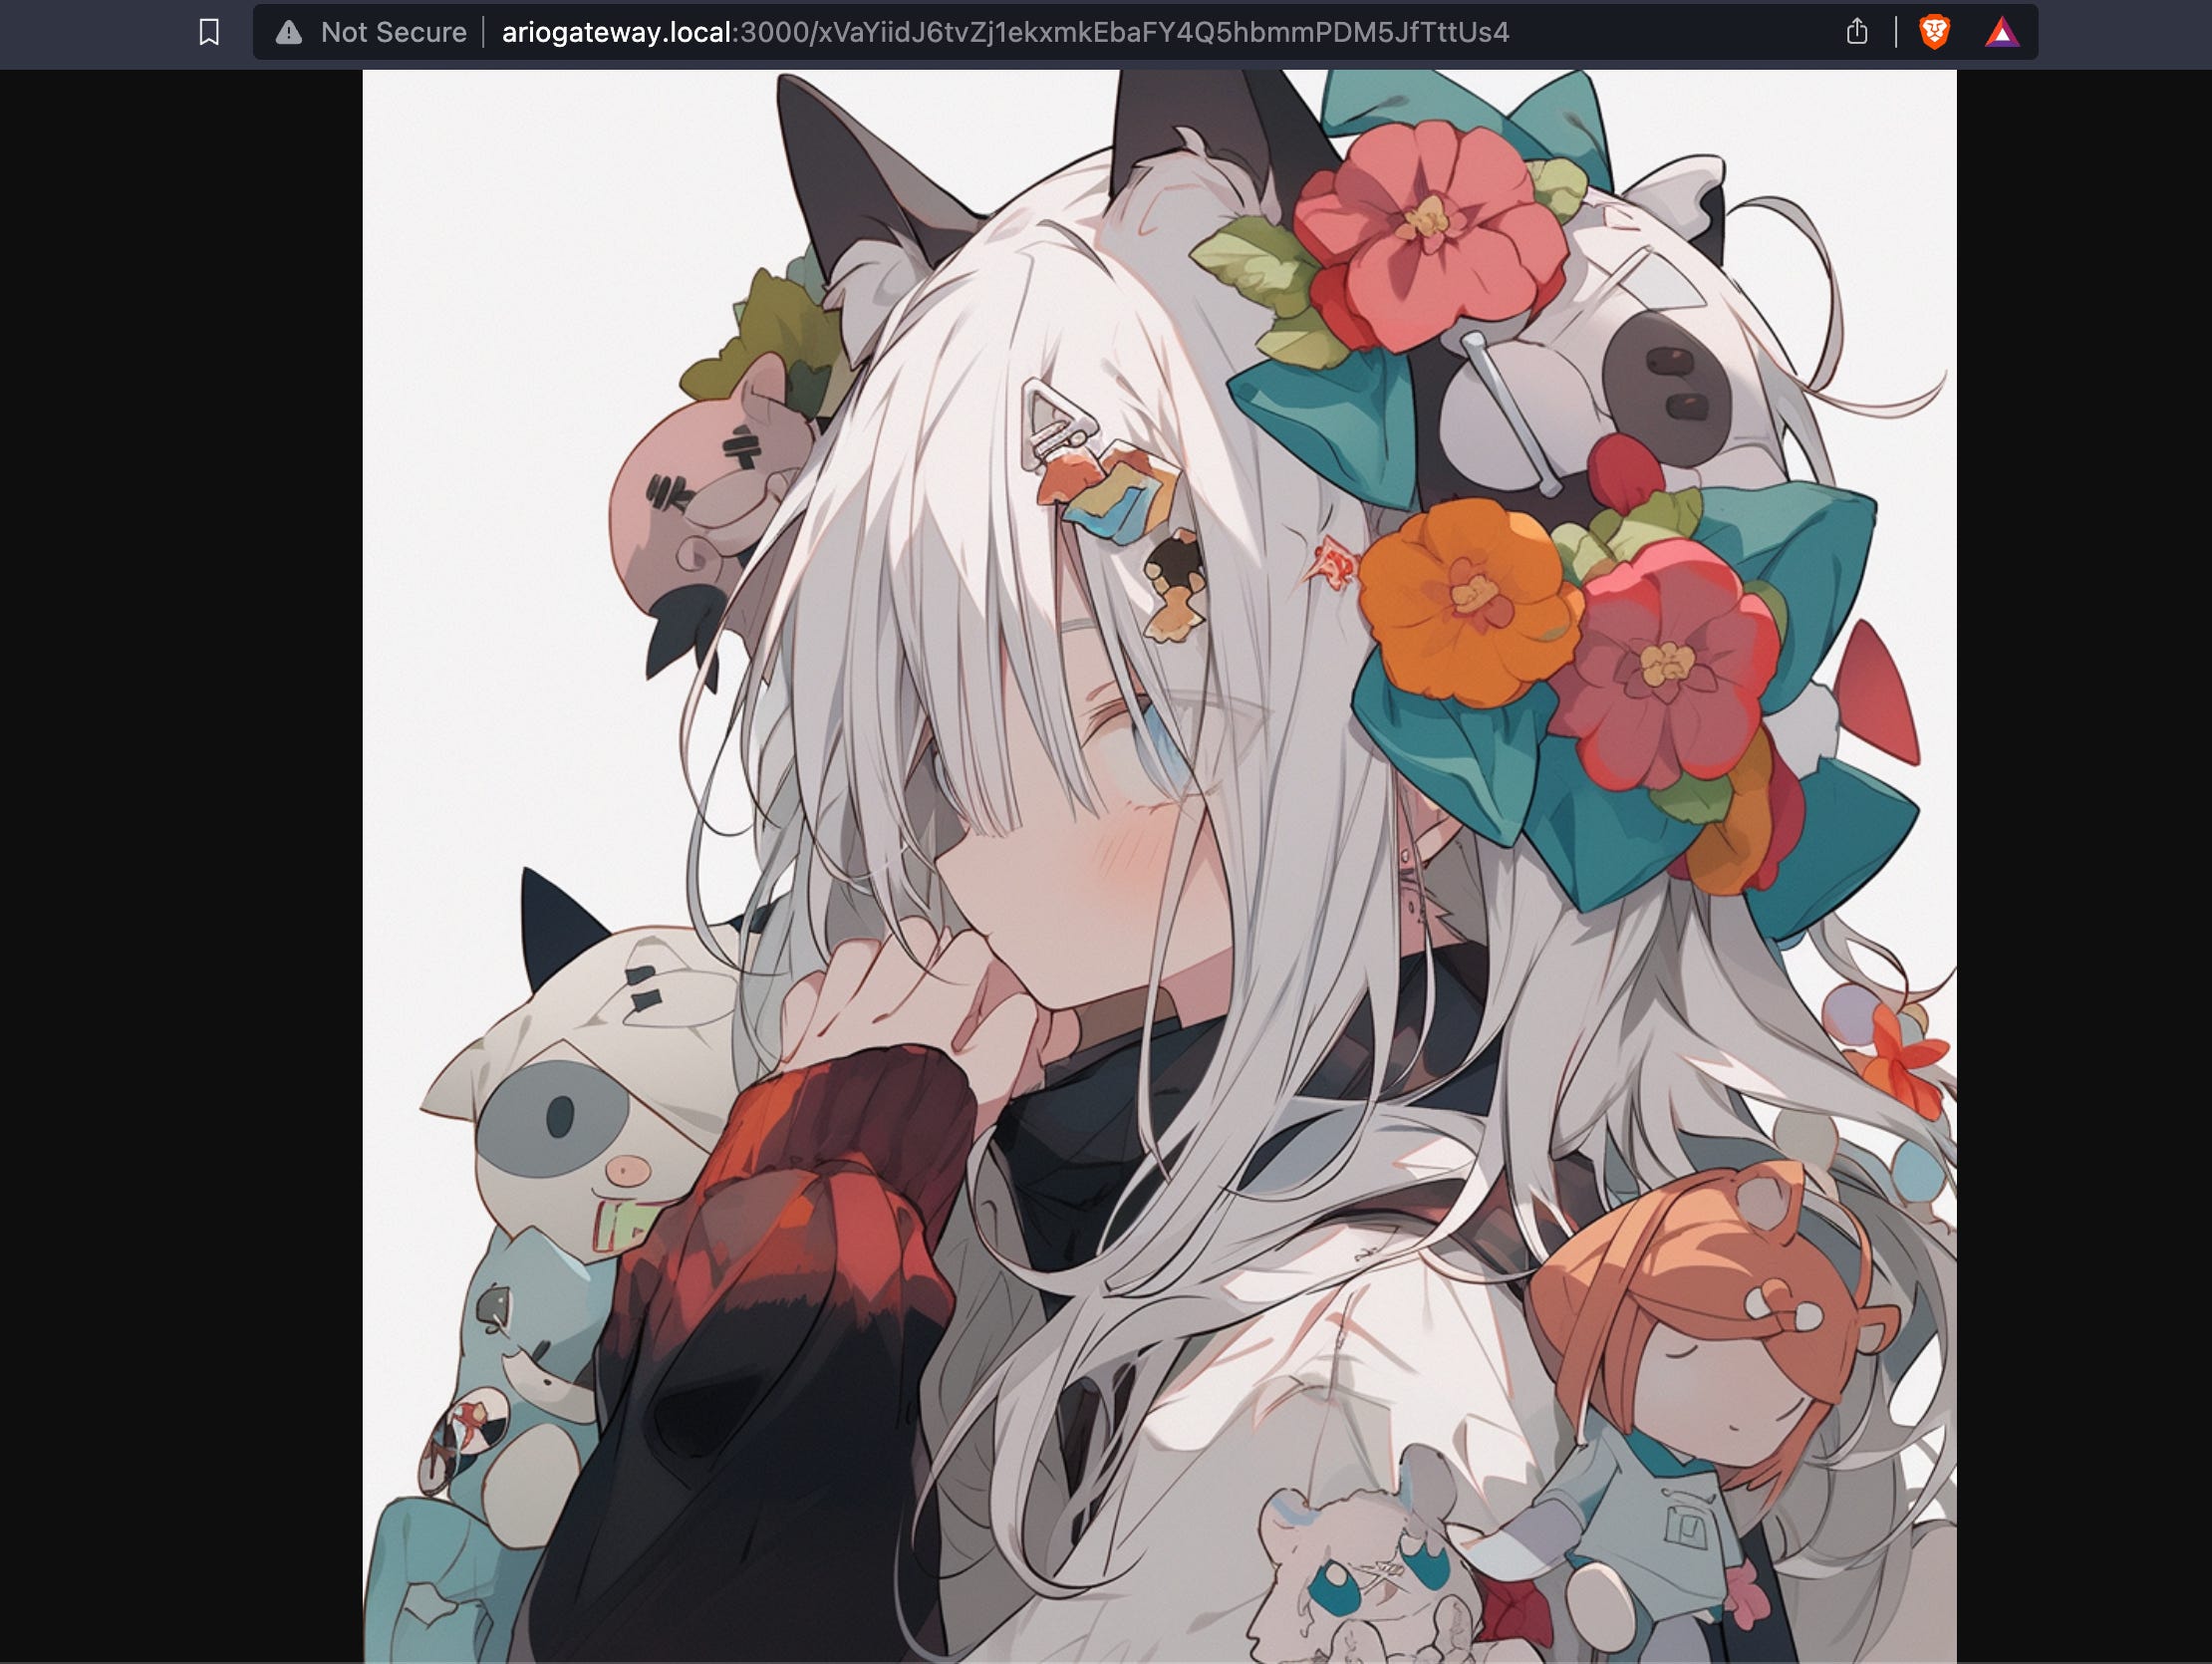
Pretty cool right?
Next, lets visit the Ardrive decentralized app. The DApp IDs can be found at https://ardrive.io/dapp-history-of-ardrive/. The latest as of writing is 2.13.0, at UdkSGsqhfAt9McTfoCcgbvH4fz623ZKQCxSV1Pfqu3I. Let’s head over to http://ariogateway.local:3000/UdkSGsqhfAt9McTfoCcgbvH4fz623ZKQCxSV1Pfqu3I/.
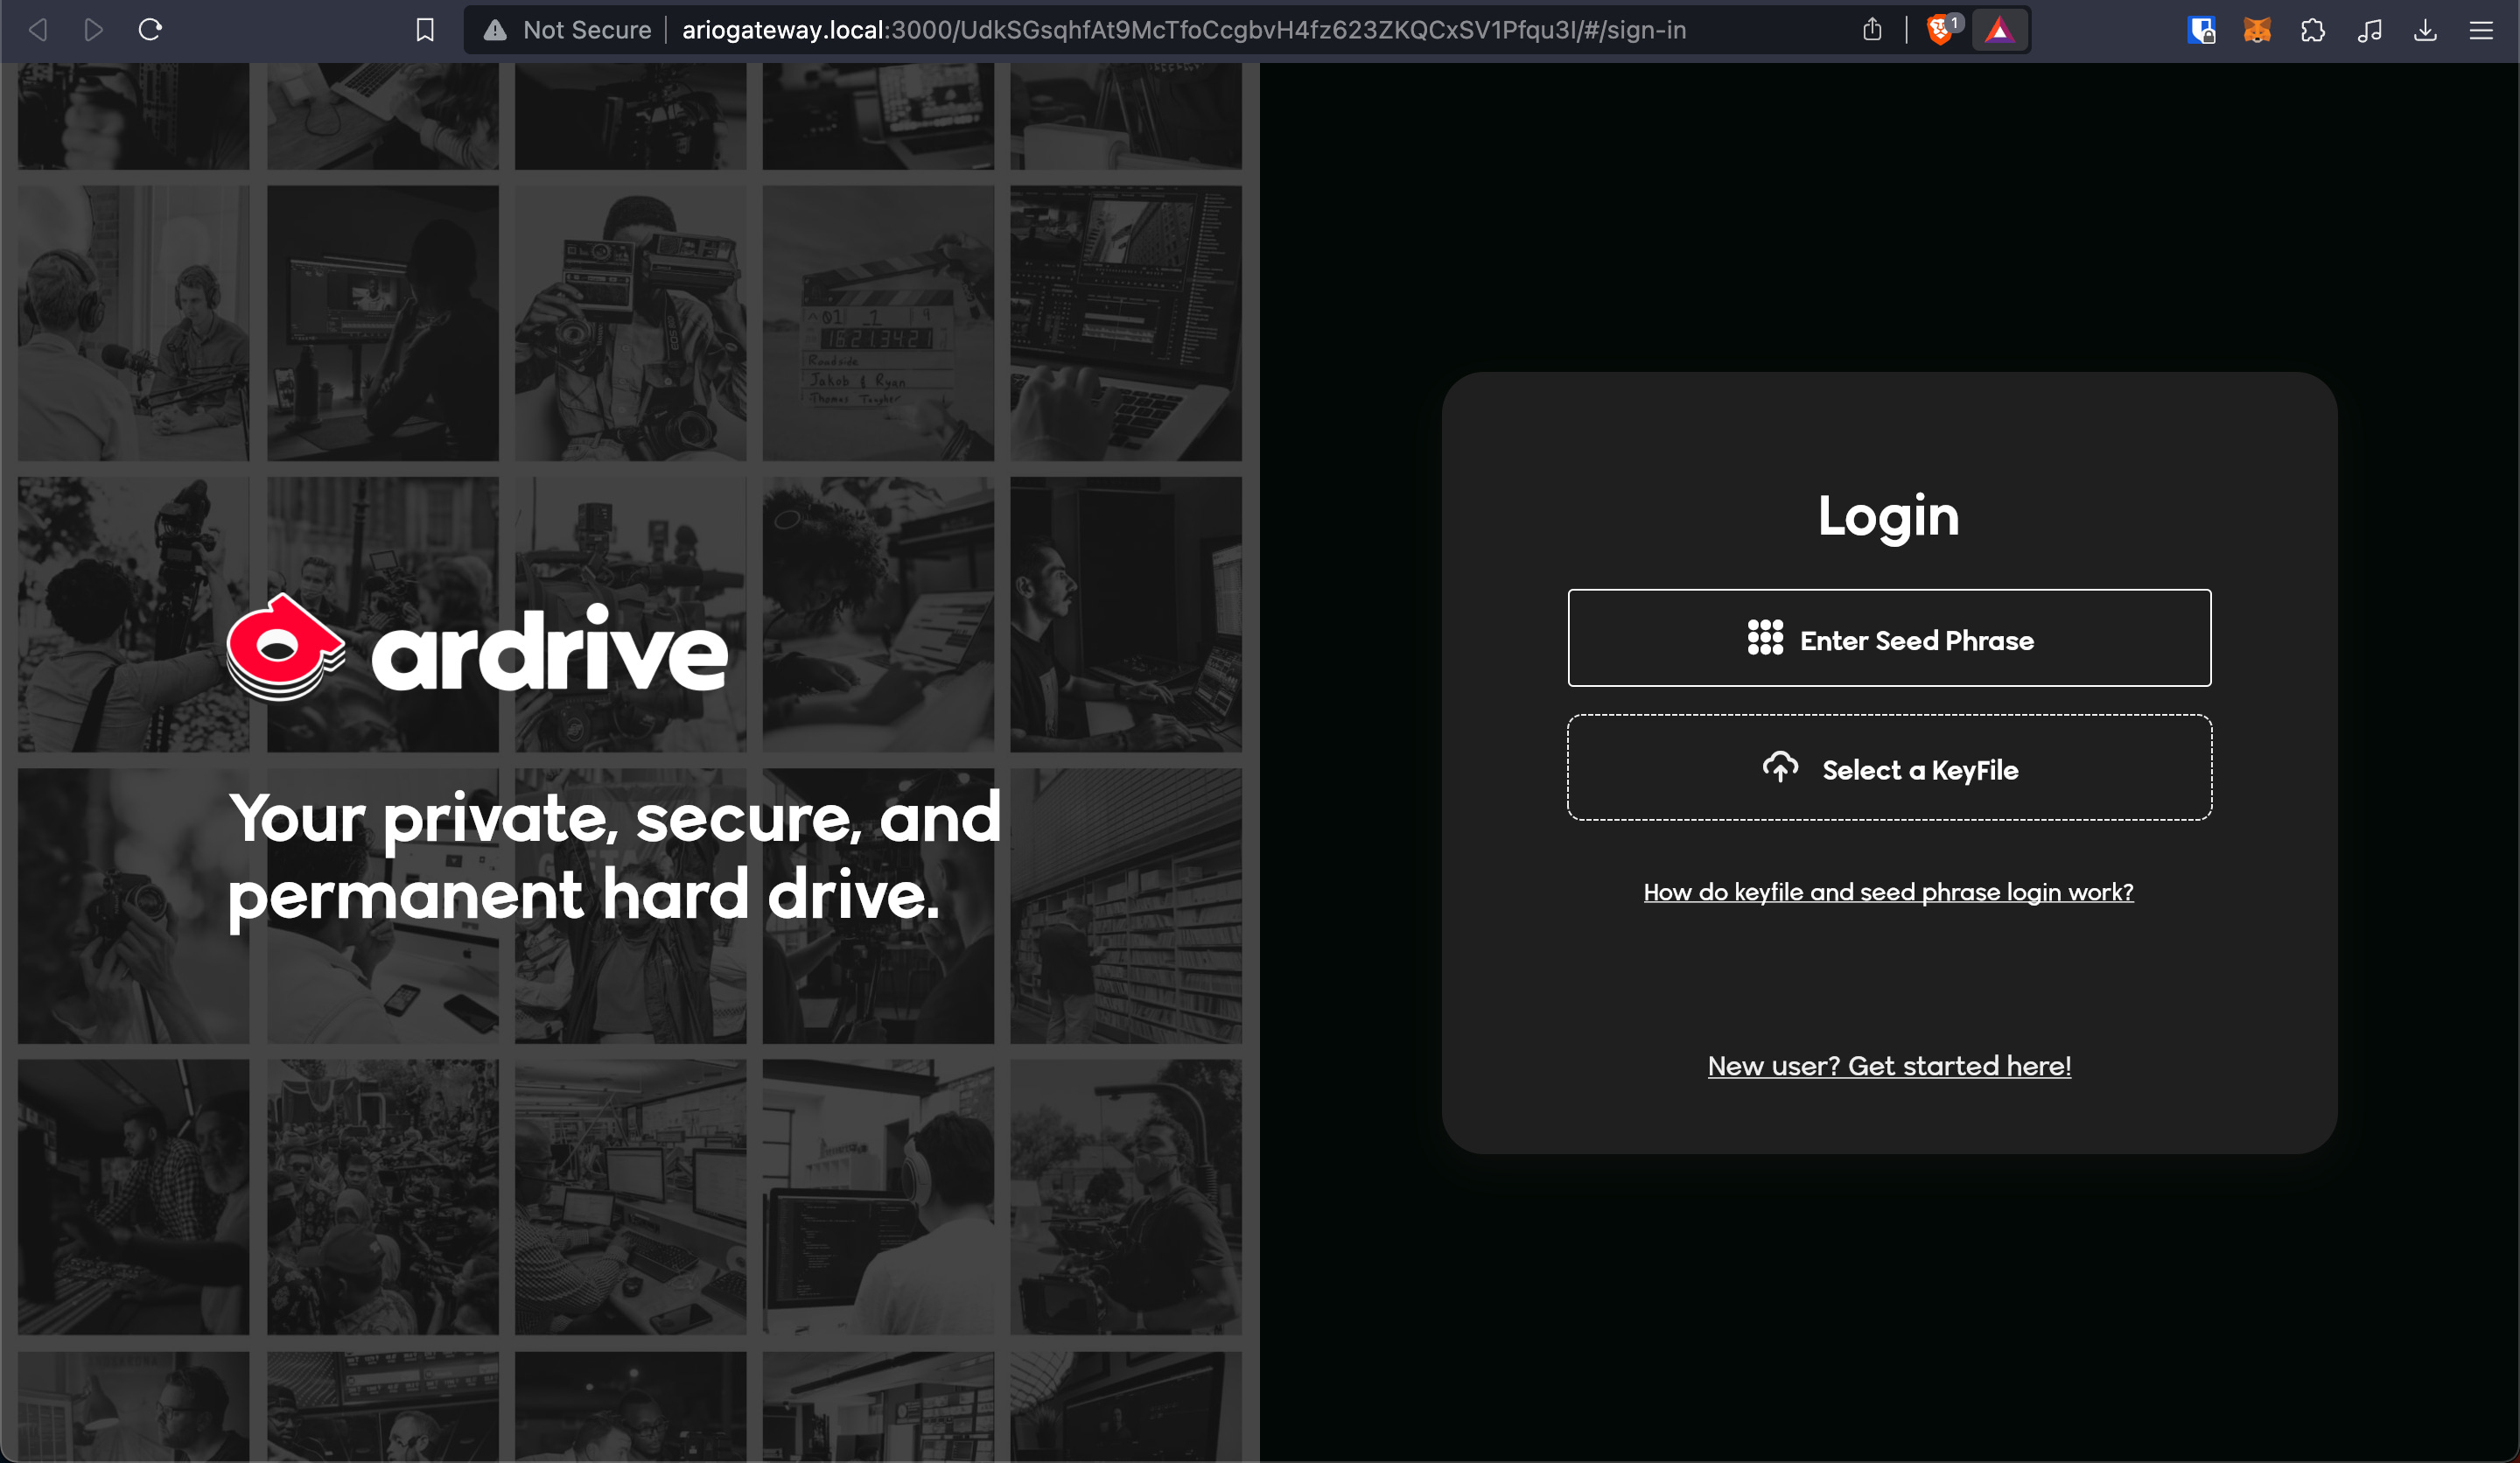
Congratulations, you have everything you need to privately query the Arweave blockchain. In the following steps, we will make some final configurations to open our node to the world.
Final Configurations
Before making more changes, lets turn off the Gateway by stopping all docker containers.
The
$(...)is a handy syntax that acts like a variable, first executing then returning output; here it returns a list of docker containers.
sudo docker stop $(sudo docker ps -a -q)1. Allow access to your Pi from the internet
1. Set Raspberry Pi IP
Before we allow access to our Pi, we need to know where it is, reliably. Recall that when we pinged our Pi, it returned an IP address 192.168.50.16. This was randomly assigned by our router, using Dynamic Host Configuration Protocol (DHCP). That IP may expire or change any time we power off our router. Now that we know that this IP is free and valid for assignment, we will permanently assign it, changing it from a "dynamic" to a "static" IP.
First lets change our netplan directory using:
cd /etc/netplanAs described in the official website, netplan configures our network based on simple settings in a YAML formatted file. The default file will be /etc/netplan/<some file name>.yaml. lets list our netplan directory:
ls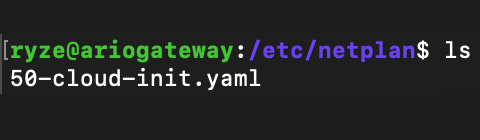
Ours is called 50-cloud-init.yaml by default. If you are following along with this tutorial, it is likely yours has the same name.
Lets edit the file using the built-in nano text editor for Linux.
sudo nano 50-cloud-init.yaml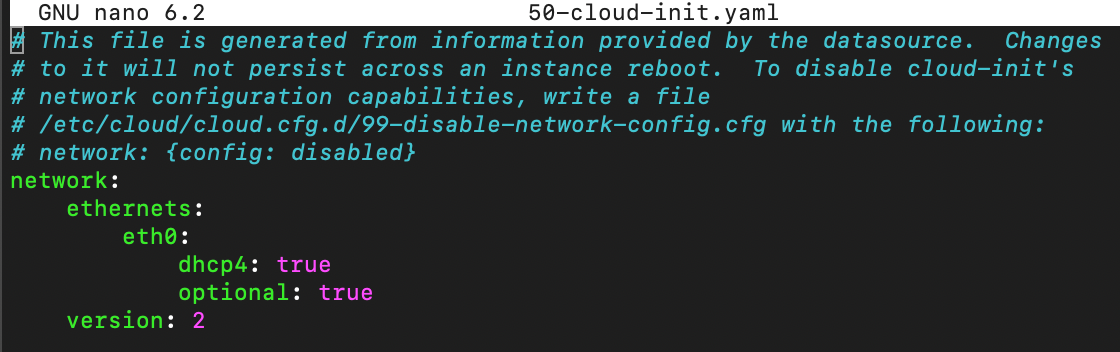
As you can see, DHCP was running as expected. Lets change our file, adding the address we want for our Pi, our router (also known as a network gateway) IP - which should be found underneath the router casing, as well as our nameservers.
DNS (Domain Name System) nameservers are simply IP address databases that computers reference to find other computers. Try
pinging Google in your terminal, you will also see it also has an IP address. The domain google.com is just a handy name that "resolves" to that IP. DNS providers save a record of what IPgoogle.compoints to. We are specifying the default most popular DNS providers below: 8.8.8.8 (Google DNS) and 1.1.1.1 (Cloudflare) to query when looking for IP resolution.
network:
    ethernets:
        eth0:
            addresses: [192.168.50.16/24]
            gateway4: 192.168.50.1
            nameservers:
                addresses: [8.8.8.8, 1.1.1.1]
    version: 2
2. Forward traffic to the Pi
Note: Exposing home services and networks to the internet involves risk and caution should be exercised. The following steps are for information purposes only, proceed at your own risk. If in doubt, contact your ISP.
Find your home router URL or IP by viewing the underside of the router itself or by using terminal commands like netstat. Head over to that IP in your browser.
This will bring you to your router’s login page (login info underneath the router).

Next find the settings for port forwarding, and forward ports 80 (http) and 443 (https) to the Raspberry Pi IP we set above. Exact steps will differ on every router.

You can find the public IP address of your router by searching Google for “What’s my IP?“. Assuming you’re not using a VPN, this will be your public router IP. You should now be able to visit this IP and be forwarded directly to the Pi, viewing the basic stats page we saw before.

3. Set up https certificates
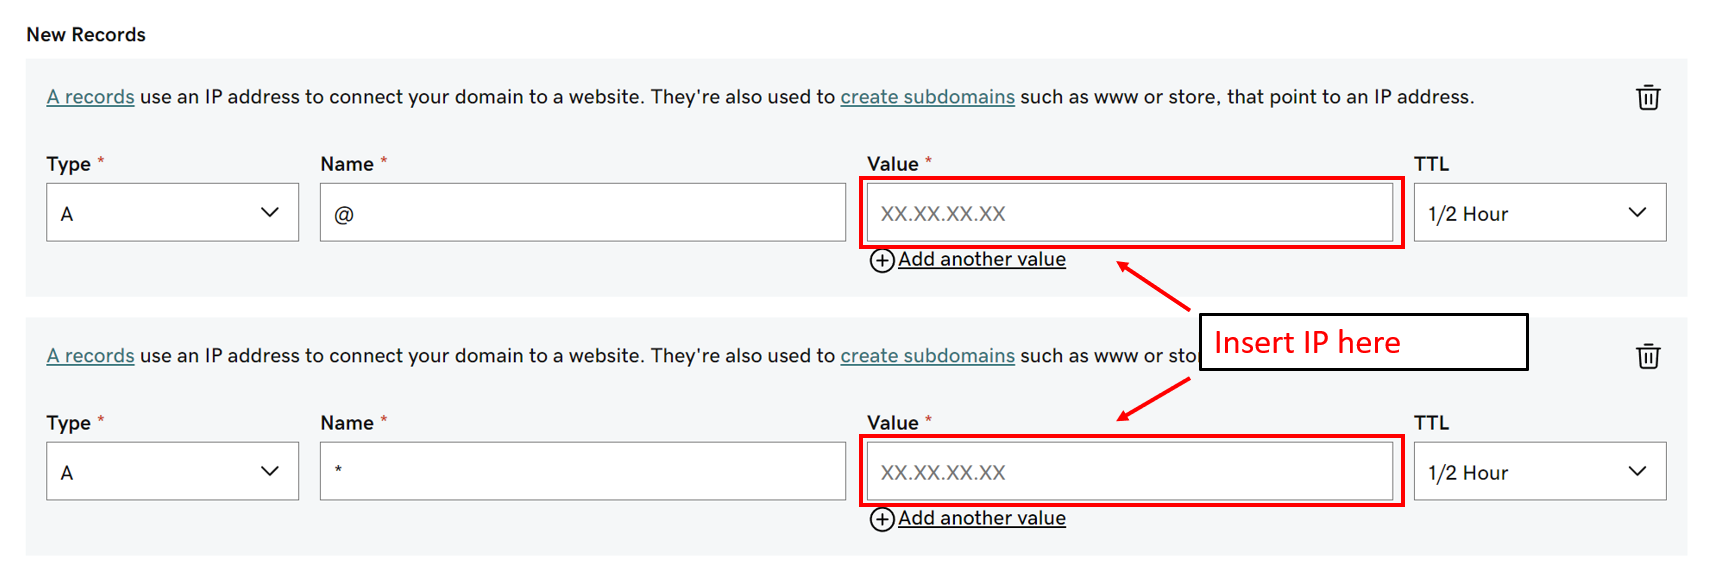
Head over to a domain name provider of your choice, e.g. GoDaddy, and pick up a domain name of your choice. We’re using ario-gateway.com.
You will need to add two A records which point to your root (@) which is the domain name itself, as well as wildcard (*) which will resolve to any subdomains, e.g. https://look-at-my-potato.ario-gateway.com/.
SSH back into your terminal.
Next run the following command, updating with your new domain.
sudo certbot certonly --manual --preferred-challenges dns --email <your-email-address> -d <your-domain> -d '*.<your-domain>'Certbot will ask you to add another record to your domain, this time it is a TXT record. This will verify that you own the domain.
4. Configure NGINX to use our certificate
We want to use NGINX, a server and load balancer, to do three things:
Redirect all http requests to secure http (https)
Listen for those https requests and secure them using certbot certificates
Forward these requests to port 3000, where our gateway is running.
Here we can edit our default NGINX config, located at /etc/nginx/sites-available/default.
It’s easier to just remove the file with rm, create a new one with nano and paste in the text.
Lets delete the default file
sudo rm /etc/nginx/sites-available/default…and start a new one
sudo nano /etc/nginx/sites-available/defaultHere is the config template. Remember to replace <your-domain> with the domain you purchased earlier.
# Force redirects from HTTP to HTTPS
server {
    listen 80;
    listen [::]:80;
    server_name <your-domain> *.<your-domain>;

    location / {
        return 301 https://$host$request_uri;
    }
}

# Forward traffic to your node and provide SSL certificates
server {
    listen 443 ssl;
    listen [::]:443 ssl;
    server_name <your-domain> *.<your-domain>;

    ssl_certificate /etc/letsencrypt/live/<your-domain>/fullchain.pem;
    ssl_certificate_key /etc/letsencrypt/live/<your-domain>/privkey.pem;

    location / {
        proxy_pass http://localhost:3000;
        proxy_set_header Host $host;
        proxy_set_header X-Real-IP $remote_addr;
        proxy_set_header X-Forwarded-For $proxy_add_x_forwarded_for;
        proxy_http_version 1.1;
    }
}
Paste in the config text, exit and save.
Let’s check for errors using
sudo nginx -t
✅ No errors found
Let’s restart the service so it will run using the above config.
sudo service nginx restartNow let’s update our gateway environment variables to use https, referencing our domain.
sudo nano /ar-io-node/.envAdd the following line, replacing with your domain:
ARNS_ROOT_HOST=<your-domain>Also, we update the SANDBOX_PROTOCOL value from http to https.
That’s it, lets shut our gateway down then start it up again. Remember you must be in your /ar-io-node directory to run the code below. Wait until the shutdown is complete before starting it again.
sudo docker-compose down -vsudo docker-compose up -d --build2. Test our live Gateway over the internet
Lets try our some ARnS names, lets visit the homepage of Sam Williams, the founder of Arweave at:
https://sam.ario-gateway.com/.

Tip: You can also view what transaction ID the page resolves to using browser developer tools -> "Network" -> Click the page name -> Select "Headers".

Conclusion
Congratulations, you have set up an ar.io gateway in your own home and allowed it to be securely accessed by anyone in the world. Thank you for supporting the Permaweb!
great write up!